Night photography has come a long way especially on modern smartphones like the iPhone 16. But getting a sharp, well-lit shot in low-light conditions still requires more than just tapping the shutter.
Whether you’re capturing the city skyline at dusk or a quiet street under moonlight, this guide will walk you through the best night photography settings and tips on your iPhone 16. You’ll learn how to optimize features like Night Mode, manual exposure, ISO, shutter speed, and much more.
Why Night Photography Can Be Challenging on a Smartphone
Shooting in low light introduces unique challenges:
-
Camera sensors struggle to collect light, resulting in noisy, blurry, or underexposed images.
-
Auto-exposure settings may overcompensate or underdeliver in tricky lighting conditions.
-
Without proper stability and technique, images often suffer from motion blur.
The good news? The iPhone 16 is equipped with tools that can overcome these challenges if used correctly.
Best iPhone 16 Settings for Stunning Night Shots
Here are the settings you should optimize:
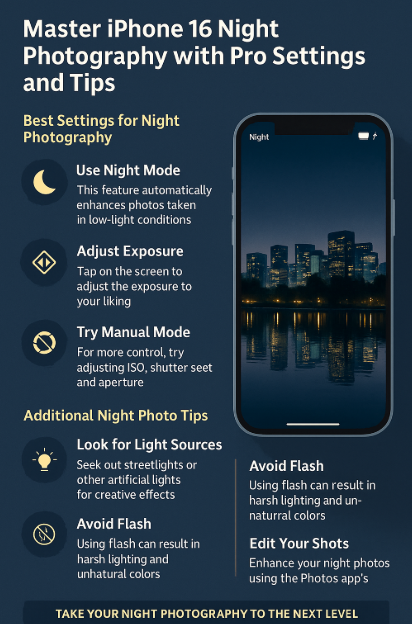
1. Use Night Mode (Built-in)
Night Mode automatically detects low-light environments and adjusts exposure accordingly. Make sure it’s enabled in Settings → Camera → Preserve Settings, and toggle Night Mode ON.
2. Adjust Exposure Manually
Tap the screen to focus, then slide the exposure bar upward to increase light intake for darker scenes.
3. Use a Tripod or Stable Surface
Camera shake is your worst enemy in low light. Even placing your phone on a ledge can dramatically increase sharpness and detail.
4. Shoot with Manual Mode (Third-Party Apps)
Apps like Halide or ProCamera give you manual control over ISO, shutter speed, and focus. Use them for advanced creativity when auto settings fall short.
Additional Pro Tips for Better iPhone 16 Night Photography
-
Look for Light Sources: Position your subject near streetlights, neon signs, or any indirect light source to avoid graininess.
-
Avoid Flash: Flash can wash out your scene or create harsh shadows. Stick to natural or ambient light for best results.
-
Edit Thoughtfully: After taking your shot, use editing apps to tweak exposure, warmth, and sharpness. Subtle enhancements can make night shots pop.
Pair These Tips with Essential iPhone 16 Utilities
Level up your shooting experience with these helpful iPhone 16 guides:
What This Means for You
The iPhone 16 is capable of stunning night photography but only if you use it wisely. By mastering Night Mode, learning to adjust exposure, and using tools like tripods or manual camera apps, you’ll be able to capture photos that rival those taken on DSLR cameras.
This not only improves your social media posts, portfolio quality, or personal memories it makes you a more skilled mobile photographer.
Conclusion: Night Photography Mastery Starts Here
Like any form of photography, mastering night shots takes a blend of technique, patience, and practice. With the right settings and a bit of experimentation, your iPhone 16 can produce professional-grade results in even the darkest conditions.
So the next time you’re out after sunset, don’t just put your phone away pull it out and capture the magic.